|
Cyber
Question:
How
to perform the Plug & Play setup on a TV?
Answer:
When you turn on the TV for the first time you will be walked through configuring
the TV for your system. This setup is called "Plug & Play"
you can always go back through the Plug & Play at anytime and reset your
TV back to its original settings. When going through the Plug & Play
setup just follow the on-screen instruction. Below is the setup process.
- Turn on the TV.

- The first step will be selecting the menu
language; English
will be selected by default. If you would like to select a different
language for the main menu use the ▲ or ▼ button to select your desired
language from the available options. Press the ▶ button to select "Next", and
then press ENTER.
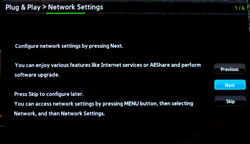
- The next part of setting up your TV will be
connecting it
to the internet. Press ENTER to continue to the "Network Settings"
portion of the setup. If you are not connecting your TV to the internet
you can skip Network Setup. Use the
▲ or ▼ button to select "Skip" and then press ENTER. Skip
to Step 8 in this Guide
- Use the ▲ or ▼ to select you type of network
setup, and then
press ENTER. "Next" will be highlighted press ENTER
to continue.
Note: If you have selected Wired Skip to Step 6.
- Select
your wireless network from the list of available networks and then press
ENTER.
"Next" will be highlighted, press ENTER to
continue.
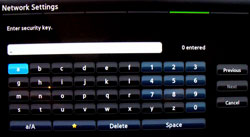
Important:
If your router has a security password you will need to enter in your security
credentials using the on-screen keyboard and directional pad on the remote. After
entering your security code select "Next" and press
ENTER.
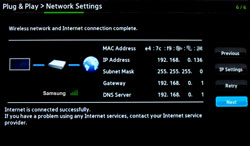
- Your TV will test your network connection and
report any problem.
- If there are no issue "Next" will be
highlighted, press
ENTER to continue and continue to the next step in this guide.
- If there are networking problem click here to
open our network
troubleshooting guide.
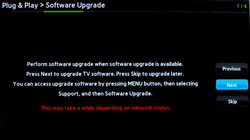
- You will be prompted to check for any software
update for
the TV. If updates are available you can update the TV to the latest firmware
available. You may also choose to skip this step and check for updates later.
- After updating your firmware you will need to
select whether
this TV is intended for Home Use or Store Demo. "Home Use" will
be selected by default and is the recommended setting. Press the ▶ button to select "Next", and
then press ENTER to continue.
Note: If you select "Store Demo" your TV will revert
to factory default settings every 30 minutes and every time the TV is powered
off.
- Now you will set the internal clock of the TV.
You will have
the option of Auto and Manual. Use the ▲ or ▼ to select your clock setup, and then
press ENTER. "Next" will be highlighted press ENTER
to continue.
- Auto will automatically set the internal clock based
on the time feed on incoming broadcast signals. This option will only
work if the TV is connected to a coax cable or antenna connection. If
this connection is not present the automatic clock set will not function.
Note: If you live near the edge of a time zone and the TV
pulls the information from a broadcast channel in a different time zone
the clock will not be correct for your time zone. Also if the broadcaster
is not transmitting time information the automatic clock set will not
function.
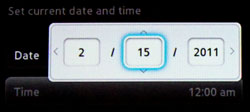
- Manual allows you to manually enter the time and date information
into your TV. Use ▲ or ▼ to select time or date for modification, and then
press ENTER. Use the directional pad to make adjustments and then
press ENTER. When you are finished making adjustments press the
▶ button, "Next" will be highlighted press ENTER
to continue.
- Now
your TV will begin the process of scanning for incoming signals from your
Cable or Antenna coax connection press ENTER
to Continue.
Tip:
If you do not have a cable or antenna coax connection feel free to skip
this step and skip to Step 15 in this guide.

- Use
the ▲ or ▼ to select your signal source and then press ENTER
to select it (Cable will be selected by default). After selecting your signal
type press the ▶ button, "Next" will be highlighted press ENTER
to continue.
- Now
you will select the Cable System type, you can select from STD, HRC, IRC.
- STD
(Standard): This is selected by default and is the most common cable
system type used.
- HRC
(Harmonically Related Carriers): This cable system may be used by some
cable providers or in locations where cable signals are rebroadcast
to a community.
- IRC
(Incrementally
Related Carriers): This
cable system may be used by some cable providers or in locations where
cable signals are rebroadcast to a community.
After
selecting your cable system type press the ▶ button, "Next" will be highlighted press ENTER
to continue.
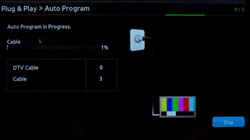
- The
TV will scan incoming signals and store all channels that have a strong enough
signal and are not scrambled. Wait for this scan to finish.
Tip:
The channel scanning can take
20 minutes or more to complete.
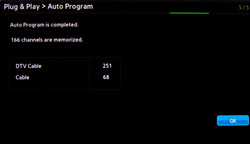
- When
the channel scan finishes it will display the amount of channels found.
Press
ENTER
to continue.
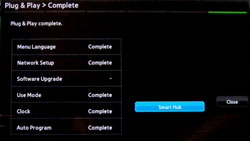
- You
have now completed the Plug & Play setup. You will see what portions
of the setup were completed or skipped. You can now close out of the setup
or jump directly into the Smart hub. Make your selection and then press
ENTER.
����������������������������������������������������������������������������������������������������������������������������������������������������������������������������������������������������������������������������������������������������������������������������������������������������������������������������������������������������������������������������������������������������������������������������������������������������������������������������������������������������������������������������������������������������������������������������������������������������������������������������������������
|
