Cyber
Firmware
Update Instructions - Ethernet (LAN) Connection Method
Automatic
Firmware updates - Some players are capable of automatic firmware updates
via the LAN connection. At the time of this article, the following models
running firmware version 2.0 or later are equipped with this feature: BD-P1500,
BD-P2500, BD-P2550. (updated 12/4/08). If the LAN cable is connected, each time
you power on your player it will advise you if a firmware update is available.
Follow the on-screen instructions for udpating the player.
Manually Updating your Player With the LAN
Connection
Before you begin, your player needs to be connected to your
television and your TV needs to be tuned to the appropriate auxiliary
input.
- Connect the Ethernet
cable to the LAN terminal on your modem and to the LAN terminal on the rear of your
BD
Player.
- Make sure
there’s no disc in the player and press the [Menu] button on the BD remote
control.
- Use the
directional buttons to select Setup > System
Upgrade > Update Start.
- After a brief
status check, the system will locate the upgrade if one’s available and a screen
showing the current and new firmware versions will appear. Use the direction buttons to select “Start” and press [Enter] to begin.
- The update will
begin and you’ll see a series of messages on the screen. When the verification’s complete, a System Upgrade window will
appear asking you if you want to update the firmware. Select “Yes” and press [Enter].
- If an HDMI update is included and you’re using the HDMI output, the
screen will turn black momentarily.
- After the
“upgrade complete” message appears the tray will close, the player will power
down and all of the settings will revert back to factory settings. Turn the player back on and allow the update to finish.
- When the
language selection screen appears, select your language by pressing the
corresponding number on the remote.
Important:
- To make sure the new
f/w was installed correctly, with the disc tray open press and hold the [INFO] button
on the remote control. The new f/w
version will be listed. You can go ahead
and remove the LAN cable or leave it connected to make future upgrades
easier.
- If the upgrade is not
possible, find the error message in the table
below and see the corresponding resolution.
|
MESSAGE
|
“Ethernet cable is not connected.
Please, check
the Ethernet cable”
|
“This system cannot connect to internet for update.
Please, check the network setup”
|
"The latest version of the firmware is already
installed.
There is
no need to update."
|
"Please maintain "No Disc" state
for network update."
|
“Update Server is under maintenance.
Please try
again later.”
|
|
RESOLUTION
|
The cable is not
connected.
|
The network connection has failed.
|
A newer version is not available.
|
Remove any discs from the player.
|
Server service is not available.
|
|
|
Important:
If the firmware update
is not successful you may need to set up your IP address,
Subnet, Mask, Gateway and DNS by following the steps below.
To obtain these settings, see “Finding
Your Network Settings”
below
or contact your
internet provider.
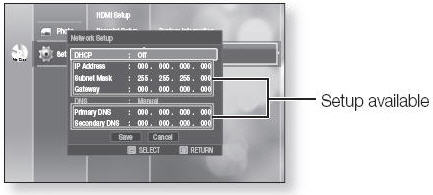
Manually enter Network Settings
- With
the unit in Stop mode, press the MENU button.
- Press the ▲▼ buttons to select System
Upgrade, then
press the ENTER button.
- Press the ▲▼ buttons to select Network
setup, then
press the ENTER button. You will see a menu that allows you to make
network settings.
- Press the ▲▼ buttons to select DHCP,
then press the ENTER button.
- Press the ▲▼ buttons to select OFF
then press the ENTER button.
- Press the ▲▼ buttons to select DNS, then press the ENTER
button.
- Press the ▲▼ buttons
to select MANUAL then press the ENTER button.
- To select
and enter items, use the number and ▲▼ buttons.
When done, use the arrow buttons to select Save,
then press the ENTER button.
- If
you don’t want to save your work, use the ▲▼ buttons
to select Cancel,
then press the ENTER button.
Note: DHCP and DNS must be set to OFF and MANUAL
respectively or set-up of certain items will not be possible.
Finding Your Network Settings: IP address, Subnet Mask, Gateway
and DNS
|
In
Windows NT, ME, 2000 and XP
|
- Select
Start > Run. Type "command"
into the dialog box, then click OK.
- In
the resulting command line window, type "ipconfig
/all". The IP address, subnet mask, gateway and
domain name servers (DNS) will be displayed in the active
window.
|
|
Mac OS 8-9.x
|
- Click
on the Apple Menu > Control Panel > TCP/IP.
The TCP/IP Control Panel will open containing the
IP address, subnet mask, gateway and domain name servers
(DNS).
|
|
Mac OS 10.x
|
- Click
on the Apple Menu > System Preferences > Network.
If the network settings are grayed out, click the
lock to make changes.
- Enter
in the admin account name and password to
proceed with viewing the network settings.
- Choose
the Ethernet port by clicking the double arrows next
to Show Fields and select Built in Ethernet.
- Click
on the TCP/IP tab. The IP address, subnet mask, gateway
and domain name servers (DNS) will be displayed in the active
window.
|
��������������������������������������������������������������������������������������������������������������������������������������������������������������������������������������������������������������������������������������������������������������������������������������������������������������������������������������������������������������������������������������������������������������������������������������������������������������������������������������������������������������������������������������������������������������������������������������������������������������������������������������������������������������������������������������������������������������������������������������������������������������������������������������������������������������������������������������������������������������������������������
|

