|
Cyber
The
steps below cover how to connect your Blu-ray player to a PC on your network.
If you need help with the settings on your PC because the Blu-ray is not seeing
your PC on the network, click the Tips link at the bottom of this article that
applies to the version OS you're using.
To
setup PC streaming on your Blu-ray Player, follow these steps:
- Turn
on your TV and Blu-ray player.
- Using
the TV remote select the input where you have the Blu-ray player connected.
If you do not know how to change your TV’s input, consult the TV’s owners manual.
- The
e-contents menu appears listing Blockbuster, Netflix, Pandora, and YouTube options. If you have a disc in the Blu-ray player, press stop.

- Press
the Menu button and then press the red A button on your remote control to perform
a Network Search.

- The
Network Search Type menu appears. Using the arrow buttons on your remote, highlight
Auto and then press enter.
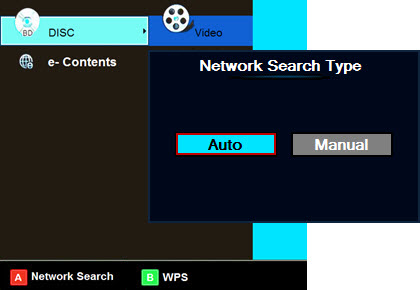
- Your
Blu-ray player begins searching for other PC’s on your network and then
lists them on the left hand side by PC name.
Note: If your PC name
contains more than 12 characters you must use the Manual mode to search
for your PC.
- Using
the bottom arrow on your remote control, scroll to the PC you want to stream
from and then press enter.

- A
prompt appears asking you to enter the User Name, this refers to the
PC name. Using your remote to navigate the on screen keyboard, enter your PC
name and then press the blue D button to save.
Tip:
The
User name is the same PC name that appears in the network search results and
is not case sensitive.

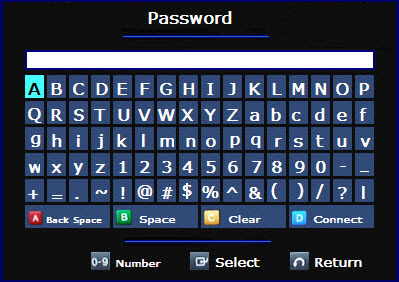
- A
second prompt appears asking for the PC User password. Enter your user password.
If you do not use a password, leave this field blank and press the blue D button
to save. In this case since we’re using Vista and the file sharing password
has been turned off, we leave the field blank and press D to save and continue
to the next step.
Note:
For convenience you can use the number buttons on the remote control. To enter
lower case and upper case letters, use the on screen keyboard. The password
is case sensitive.
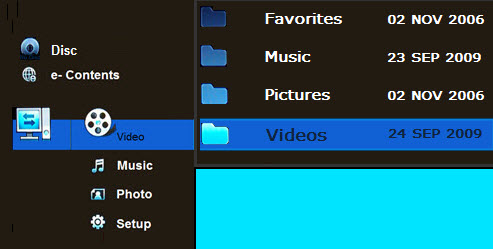
- The
Blu-ray player connects to your PC and then displays the PC contents.
Using the top and bottom arrows on your remote control, scroll to where
your shared folder is located. For example, if using the Public folder in
Vista, select public.

- Anything
not included in the shared folder will not play even if the file types
are supported. All files you wish to stream must be in the shared folder,
and the shared files settings on your PC must be set accordingly. For instructions
on how to configure your PC click the Tips link at the bottom of this article that
applies to the version OS you're using.
- Press the right arrow to select the type of file
you want to stream: Video, Music, or Photo, and then press enter. If you select
Video and then attempt to play an MP3 track, it will not play. You must
select the option that corresponds with the file type you want to stream.
Notes:
- If
multiple computers are on the network, multiple listings will appear.
- The
Blu-ray player can detect up to 4 computers on the network. If more than 4 networked
computers are detected but the one you wish to connect is not on the list you
can either turn off the other PC’s that are appearing or connect your player
using the manual mode rather than auto mode.
����������������������������������������������������������������������������������������������������������������������������������������������������������������������������������������������������������������
|


