|
Cyber
Question:
How
to perform the initial settings for a Blu-ray player?
Answer:
Your
Blu-ray player will have the same initial settings setup structure when the
player is first turned on and when the player is reset.
Before
beginning the steps below check the following:
- The
Blu-ray
player is connected to your TV, for instructions
click here.
- The
Ethernet cable is
connected to the LAN port located on the back of the
player.
When
you power on the player for the first time or when you reset your player, you
will see the following:
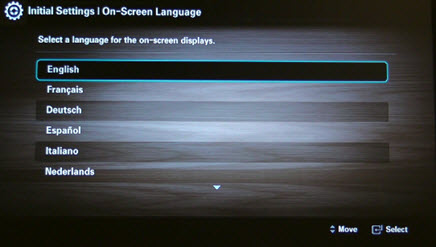
- Initial
Settings – On Screen Language. Using
the ▲ and ▼ arrows on the Blu-ray remote, select your preferred language for
on-screen displays and then press Enter/
 . This is followed by the second
initial setup screen below. . This is followed by the second
initial setup screen below.
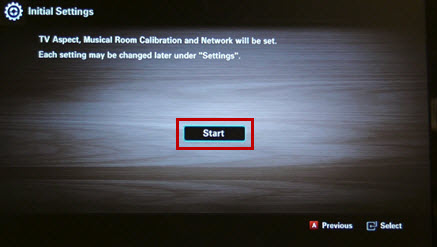
- Initial
Settings - Start
is automatically highlighted, press the Enter button on the Blu-ray remote
to begin. This is followed by the TV Aspect screen.
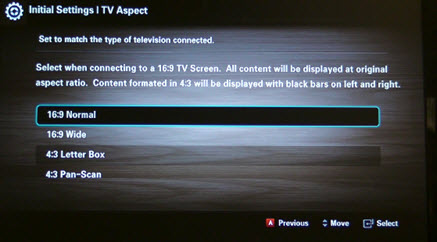
- Initial
Settings - TV Aspect. Using the ▲ and ▼
arrows on the Blu-ray remote select the option that best matches the type
of Television the Blu-ray is connected to. This is followed by the Network
setup screen.
- 16:9
- Select when connecting to a 16:9 TV screen. All content will be displayed
at the original aspect ratio. Content formatted in 4:3 will be displayed with black
bars on the left and right.
- 16:9
Wide – Select when connecting to a 16:9 TV screen. All content will fill the
full screen. Content formatted in 4:3 will be stretched.
- 4:3
Letter Box – Select when connecting to a 4:3 TV screen. All content will
be displayed at the original aspect ratio. Content formatted in 16:9 will be displayed
with black bars on the top and bottom.
- 4:3
Pan-Scan – Select when connecting to a 4:3 TV screen. 16:9 content will have
the extreme left and right portion cut off.
- Initial
Settings - Network. Using
the ◀ and ▶ arrows on the Blu-ray remote, move to Wired and
then press Enter. The Blu-ray player begins
searching for available networks in the area and displays a list once the search
is completed.
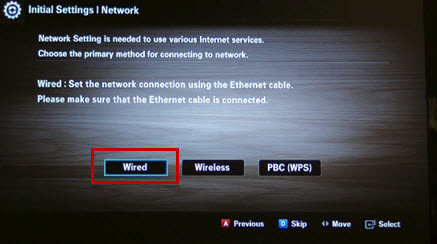
Note:
If the Ethernet cable is not connected a message, ‘Please verify that
network cable is connected’ is displayed.
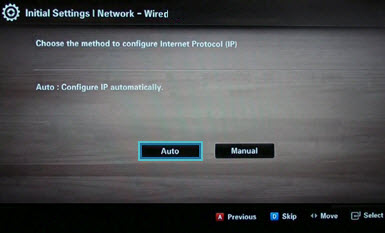
- Initial
Setting - Internet Protocol. Auto is automatically highlighted, press
Enter to select it. By selecting auto the IP address is automatically configured.
This is followed by the Network Test screen.
- The
Network Test screen is displayed. A check mark appears to the left
of each test as it passes, when complete press OK.
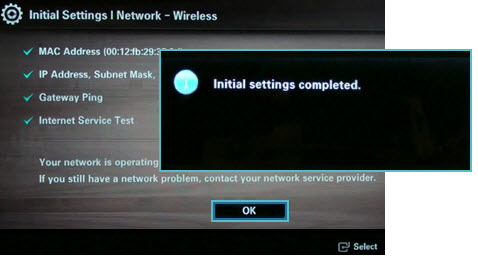
- The 'Initial settings completed'
message appears
briefly before the home menu is displayed, this
completes the Wired Setup Process.

Notes:
- These
settings can be changed later in the settings menu.
- Each
time the Blu-ray player is reset (press and hold the Stop button on the player
with no disc) you will be prompted to go thru steps 1-7.
- If
you do not wish to setup your network during the initial setup, press the blue D button on the Blu-ray remote to skip.
����������������������������������������������������������������������������������������������������������������������������������������������������������������������������������������������������������������������������������������������������
|

