|
Cyber
Question:
How to perform the initial setup process for
a Samsung Blu-ray player?
Answer:
Your
Blu-ray player will have the same initial settings setup structure when the
player is first turned on and when the player is reset.
Before
beginning the steps below check the following:
- Blu-ray player
connected to your TV, for instructions
click here.
- Samsung
Wireless LAN Adapter (WIS09ABGN or WIS09ABGN2), must be purchased separately.
- A
Broadband or DSL connection and a Router and Modem.
When
you power on the player for the first time or when you reset your player, you
will see the following:
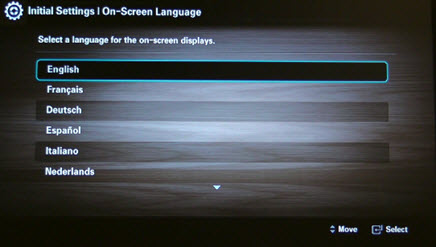
- Initial
Settings – On Screen Language. Using
the ▲ and ▼ arrows on the Blu-ray remote select your preferred language for
on-screen displays and then press Enter/
 . This is followed by the second
initial setup screen below. . This is followed by the second
initial setup screen below.
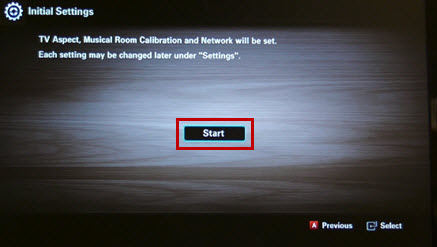
- Initial
Settings - Start
is automatically highlighted, press the Enter button on the Blu-ray remote
to begin. This is followed by the TV Aspect screen.
- Initial
Settings - TV Aspect. Using the ▲ and ▼
arrows on the Blu-ray remote select the option that best matches the type
of Television the Blu-ray is connected to. This is followed by the Network
setup screen.
- 16:9
- Select when connecting to a 16:9 TV screen. All content will be displayed
at the original aspect ratio. Content formatted in 4:3 will be displayed with black
bars on the left and right.
- 16:9
Wide – Select when connecting to a 16:9 TV screen. All content will fill
the full screen. Content formatted in 4:3 will be stretched.
- 4:3
Letter Box – Select when connecting to a 4:3 TV screen. All content will
be displayed at the original aspect ratio. Content formatted in 16:9 will be displayed
with black bars on the top and bottom.
- 4:3
Pan-Scan – Select when connecting to a 4:3 TV screen. 16:9 content will have the
extreme left and right portion cut off.

- Initial
Settings - Network. Using
the ◀ and ▶ arrows on the Blu-ray remote, move to Wireless and
then press Enter. The Blu-ray player begins
searching for available networks in the area and displays a list once the search
is completed.
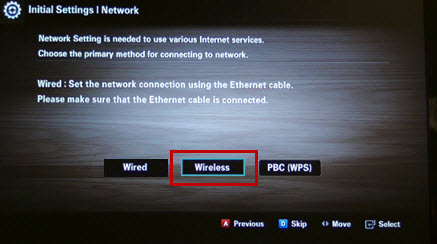
Note:
If the Samsung Wireless LAN adapter is not connected, a message, 'Please verify
that Samsung Wireless LAN adapter is connected' is displayed.
- Using
the ▲ and ▼ arrows on the Blu-ray remote select the wireless network name
(SSID)
and then press Enter. The security key screen is displayed.

Note:
You no longer have to select the type of network security on 2010 models, you only
need to enter the security key.
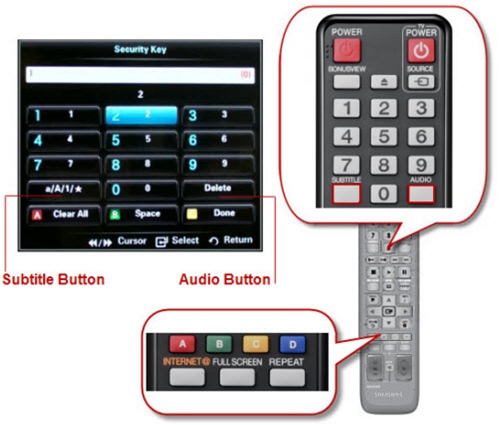
- Using
the number buttons on the Blu-ray remote enter the passkey and then press
the yellow C button when done.
- 26
character WEP keys are not supported by our Blu-ray Players. If you
are using a 26 character WEP key you will need to change your password
or use WPA encryption on your network.
- To
toggle between numbers, letters and symbols you must press the subtitle
button on the Blu-ray remote. By default the on screen keyboard is set to numbers.
- Each
number/letter/symbol is displayed above the number keypad as it is entered.
The red number that appears on the far right of the entry field keeps
track of the number of digits entered. For example, if the passkey is
13 digits but the counter shows 14 have been entered, delete the entry
and start again.
- To
delete the last digit entered, you must press the audio button on
the Blu-ray remote.
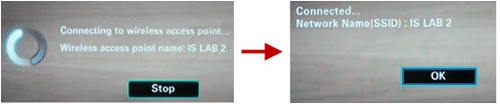
- The
Connecting to wireless access point message appears with the network name
displayed on the bottom. This is followed by a Connected message which
shows OK already highlighted, press the Enter button
on the Blu-ray remote to select. This is followed by the Internet Protocol
screen.
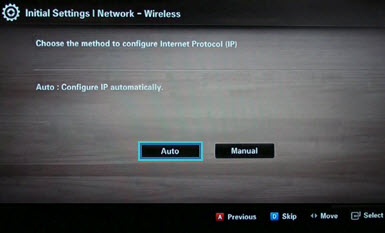
- Initial
Setting - Internet Protocol. Auto is automatically highlighted, press Enter
to select. By selecting auto the IP address is automatically configured.
This is followed by the Network Test screen.
- The
Network Test screen is displayed and displays a check mark to the left
of each test as it passes, when complete press OK.
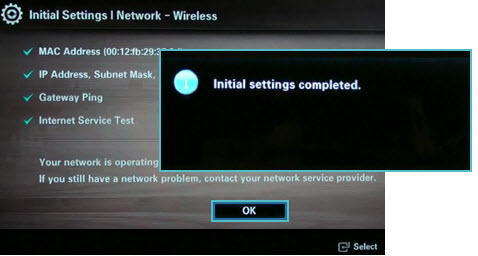
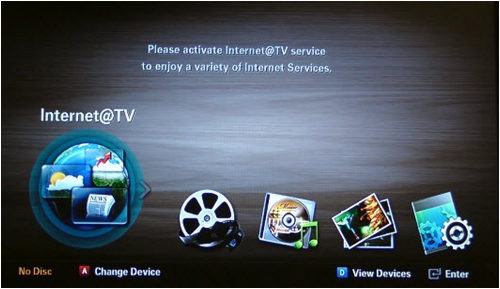
- The 'Initial settings completed'
message appears
briefly before the home menu is displayed.
Important:
If the Network Connection Test does not pass, click here for Network Connection
Test Fails.
Notes:
- These
settings can be changed later in the settings menu.
- Each
time the Blu-ray player is reset (press and hold the Stop button on the player
with no disc)
you will be prompted to go thru steps 1-10.
- If
you do not wish to setup your network during the initial setup,
press the blue D button on the Blu-ray remote to skip.
����������������������������������������������������������������������������������������������������������������������������������������������������������������������������������������������������������������������������������������������������������������������������������������������������
|

