|
Cyber
Cyber
When
the IP, Subnet, Gateway, DNS test fails it indicates one of two things:
- There is no connection to the router
- The player can see and communicate with the router but there is a failure
in communication
To
narrow down the cause and determine why there is no connection to the router we must try
the following to
establish a connection:
- Reset and power cycle the
system
(BD/Router/Modem)
- Verify network Selection
(SSID)
- Verify input of Encryption
Key
Reset and
verification of system and power
cycling all components.
- Remove any disc from your Blu-ray player and then press and hold the
Stop button to reset your Blu-ray player. Once the Player is reset
and powers back on, power it Off.
- Power off your router and modem. Wait for both components to power
off.

- Now power on your
modem and wait for all indicator lights to illuminate. Below is an image
of the main indicators. If any of the indicator lights (Power/DS/US/Online/Link)
do not come on, click
here
to go to Not All Modem Indicators Come
On.

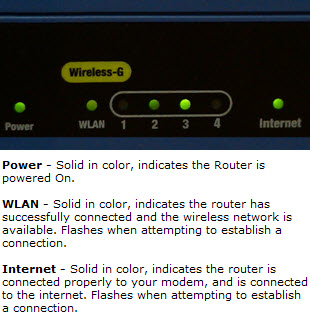
- Now power on your
router and wait for all the lights to illuminate. Below is an image of the
main indicators. If any of the indicator lights (Power/WLAN/Internet) do
not come on, click
here
to go to Not All Router Indicators Come
On.
- Now power on your Blu-ray player. The Initial
Settings – On Screen Language menu is displayed. Using
the ▲ and ▼ arrows on the Blu-ray remote select the language for
on-screen displays and then press Enter/
 . This is followed by the second
initial setup screen below. . This is followed by the second
initial setup screen below.
- Initial
Settings - ‘Start’
is automatically highlighted, press the Enter button on the Blu-ray remote
to begin. This is followed by the TV Aspect screen.

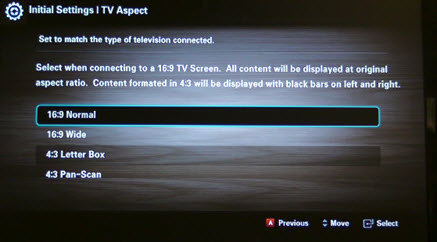
- Initial
Settings - TV Aspect. Using the ▲ and ▼
arrows on the Blu-ray remote select the option that best matches the type
of Television the Blu-ray is connected to. This is followed by the Network
setup screen.
- 16:9
- Select when connecting to a 16:9 TV screen. All content will be displayed
at the original aspect ratio. Content formatted in 4:3 will be displayed with black
bars on the left and right.
- 16:9
Wide – Select when connecting to a 16:9 TV screen. All content will fill the
full screen. Content formatted in 4:3 will be stretched.
- 4:3
Letter Box – Select when connecting to a 4:3 TV screen. All content will
be displayed at the original aspect ratio. Content formatted in 16:9 will be displayed
with black bars on the top and bottom.
- 4:3
Pan-Scan – Select when connecting to a 4:3 TV screen. 16:9 content will have
the extreme left and right portion cut off.
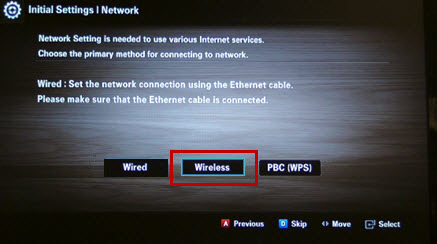
- Initial
Settings - Network. Using
the ◀ and ▶ arrows on the Blu-ray remote move to Wireless and
then press Enter. The Blu-ray player begins
searching for available networks in the area and displays a list once the search
is completed.
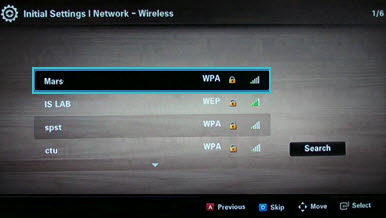
- Using
the ▲ and ▼ arrows on the Blu-ray remote select the wireless network name
(SSID)
and then press Enter. The security key screen is displayed. Be sure to select
the SSID (Network Name) assigned to your network. The encryption type and
lock icon will be displayed to the left of the signal strength bar, if nothing
is listed the network is open and does not require a password.
Important:
We do not recommend the use of open networks, lack of encryption exposes
your network and data to outside users and limits the amount of bandwidth
available for your devices. To setup network security see the accompanying
literature included with your router.
- Using
the number buttons on the Blu-ray remote pay careful attention as you enter the passkey and then press
the yellow C button when done. If you press enter instead it will add the
last character entered again and the IP address will fail since the incorrect
passkey has been entered. The number in parentheses on the far right of
the input screen will show you the number of digits entered, make sure this
number matches the number of digits that makes up your passkey.
- 26
character WEP keys are not supported by our Blu-ray Players. If you
are using a 26 character WEP key you will need to change your password
or use WPA encryption on your network.
- If
you do not know your pass key (encryption key) contact your network
administrator or the person that setup your network, if the setup was
automatic via a router setup disc, contact the router manufacturer.
We have no way of knowing your pass key (encryption key).
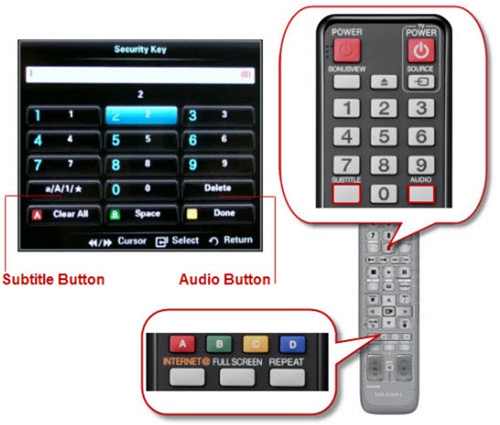
- To
toggle between numbers, letters, and symbols you must press the subtitle
button on the Blu-ray remote. By default the on screen keyboard is set to numbers.
- Each
number/letter/symbol is displayed above the number keypad as it is entered.
The red number that appears on the far right of the entry field keeps
track of the number of digits entered. For example, if the passkey is
13 digits but the counter shows 14 have been entered, delete the entry
and start again.
- To
delete the last digit entered, you must press the audio button on
the Blu-ray remote.
- The
‘Connecting to wireless access point’ message appears with the network name
displayed on the bottom. This is followed by a ‘Connected’ message which
shows OK already highlighted, press the Enter button
on the Blu-ray remote to select. This is followed by the Internet Protocol
screen.
- Initial
Setting - Internet Protocol. Auto is automatically highlighted, press Enter
to select. By selecting auto the IP address is automatically configured.
This is followed by the Network Test screen.
- The
Network Test screen is displayed. A check mark appears to the left
of each test as it passes, when complete press OK.

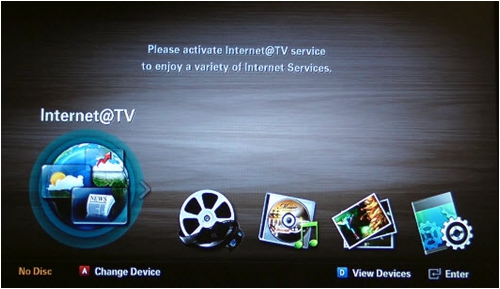
- The 'Initial settings completed'
message appears
briefly before the home menu is displayed. For step by step instructions
to setup Internet@TV, click here.
- If
the IP address test continues to fail and no connection can be made
to your router, the next step is to bypass the router and connect directly
to the modem. This will determine if the router configuration needs
to be modified or if the modem setup is the cause of the problem. Click
here
to go to IP
Address Continues To Fail No Connection Can Be Made To Router for step by step instructions.
�����������������������������������������������������������������������������������������������������������������������������������������������������������������������������������������������������������������������������������������������������������������������������������������������������������������������������������������������������������������������������������������������������������������������������������
|


