|
Cyber
Since
we have determined your Blu-ray player is set to the correct Network Option
(Cable) but the MAC address test is failing, our next step is to reset the Blu-ray
player.
Important:
All settings will revert to factory settings and all BD data will be deleted.
To
reset your Blu-ray player to factory settings, follow the steps below.
- Turn
on your Player and remove any discs, wait until the front display reads
No Disc.
- Press
and hold the Stop button on your Blu-ray player, not your remote, until
the front display reads Reset. The TV will display the message, 'Resets
all settings to the default values'. It may take a few seconds for the Player
to complete the reset process.
- The
Initial Settings/On-Screen Language screen appears. Use
the ▲ and ▼ arrows on the Blu-ray remote to select your preferred language for
on-screen displays and then press Enter/
 . .

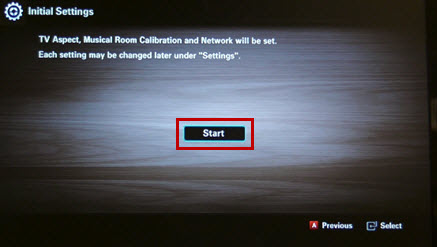
- The
message, "TV Aspect and Network will be set" will appear. Press
Enter to Start. This is followed by the TV Aspect screen.
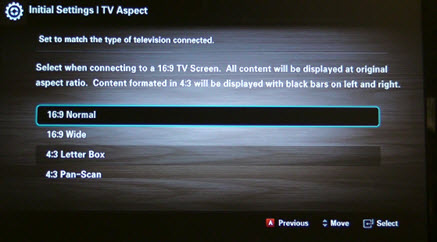
- The
Initial Settings/TV Aspect screen will appear. Using the ▲ and ▼
arrows on the Blu-ray remote, select the option that best matches the type
of Television the Blu-ray is connected to. This is followed by the Network
setup screen.
- 16:9
- Select when connecting to a 16:9 TV screen. All content will be displayed
at the original aspect ratio. Content formatted in 4:3 will be displayed with black
bars on the left and right.
- 16:9
Wide – Select when connecting to a 16:9 TV screen. All content will fill
the
full screen. Content formatted in 4:3 will be stretched.
- 4:3
Letter Box – Select when connecting to a 4:3 TV screen. All content will
be displayed at the original aspect ratio. Content formatted in 16:9 will be displayed
with black bars on the top and bottom.
- 4:3
Pan-Scan – Select when connecting to a 4:3 TV screen. 16:9 content will have the
extreme left and right portion cut off.
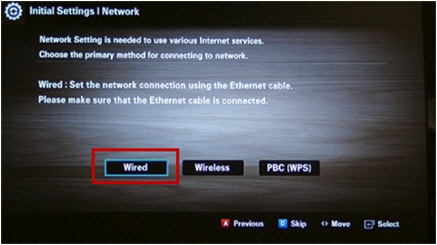
- The
Initial Settings/Network screen appears. Using
the ◀ and ▶ arrows on the Blu-ray remote move to Wired and
then press Enter.
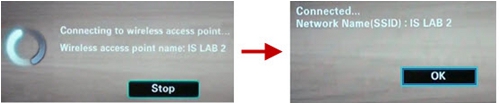
- The
Connecting to wireless access point message appears with the network name
displayed on the bottom. This is followed by a Connected message which
shows OK already highlighted, press the Enter button
on the Blu-ray remote. This is followed by the Internet Protocol
screen.
Important:
If the player does not connect, select OK and continue to the Network
Test.
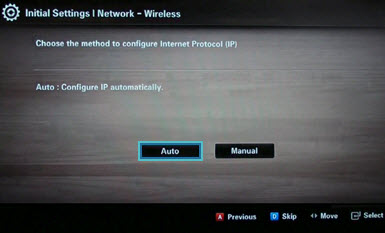
- The
Internet Protocol screen appears. Auto is automatically highlighted, press Enter
to select. By selecting auto the IP address is automatically configured.
This is followed by the Network Test screen.
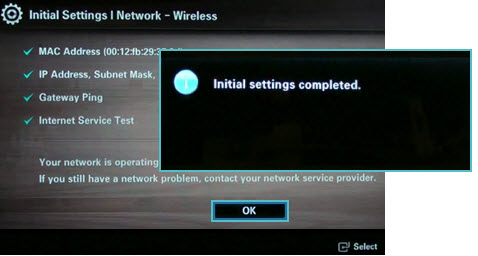
- The
Network Test screen is displayed. A check mark will appear to the left
of each test as it passes, when complete press OK.
- If
the Network Test Fails on MAC address, the player requires service. The
built-in wireless adapter may require replacement. Click the 'Create New
Service' button below to begin setting up service.
- If
the MAC address test passes but IP Address fails, click here to
return to the main errors page to continue troubleshooting.
Notes:
- These
settings can be changed later in the settings menu.
- Each
time the Blu-ray player is reset (press and hold the Stop button on the player
with no disc)
you will be prompted to go thru steps 1-10.
- If
you do not wish to setup the network during the initial setup, you can press the Blue D button on the Blu-ray remote to skip
but you must run a Network Test from Settings>Network>Network Setting>Network
Test to verify the status of the MAC Address.
���������������������������������������������������������������������������������������������������������������������������������������������������������������������������������������������������������������������������������������������������������

|
