|
STEP #1:
Select a Location
Before you install your Washer, make sure the location:
- Has a hard, level surface
- Is away from direct sunlight
- Has adequate ventilation
- Will not be freezing (below 32�F or 0�C)
- Is away from heat sources, such as coal or gas
- Has enough space so that your washer does not stand on its power cord
- Does not have any carpeting that will obstruct ventilation openings
STEP #2:
Water Requirements
- To make sure your washer fills properly, the water pressure in your house must be between 20 and 116 psi. If the water pressure is less than 20 psi, it can cause a water valve failure or prevent the water valve from shutting off completely.
- A fill time limit is built into the controls of your washing machine. If your washer takes too long to fill or has a leaking or ruptured internal hose, the washer controls will turn it off.
- Water faucets must be within 4 feet (122cm) of the washer's back to accommodate the provided inlet hoses.
STEP #3:
Install Hoses
- Place the drain hose in the drain facility. Make sure an airtight connection is NOT made between the drain hose and the standpipe. The standpipe must be at least 18 in or 46 cm high.
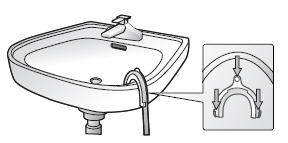

NOTE: Caution must always be exercised to avoid collapsing or damaging the drain hose. For the best results, the drain hose should not be restricted by elbows, couplings, or excessive lengths. For situations where the drain hose cannot be elevated to at least 18 in or 46 cm, the drain hose must be supported.
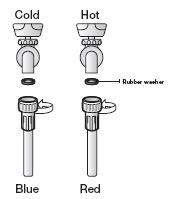
- Make sure that each inlet hose has a washer lint filter inside of it. Thread the inlet hoses to the HOT and COLD faucet connections.
- Check to see if a rubber washer is attached to the other ends of the hoses.
- Install each fill hose to the water valve. Make sure the hose with the red line is attached to the HOT faucet. Tighten by hand until snug, and then use pliers to turn it two-thirds of a rotation.
- Turn on the HOT and COLD water supply, and check all connections at the water valve and the faucet to prevent leaks.
NOTE: Connect both the HOT and COLD water valves. If one is not connected, an nF (no fill) error can occur.
STEP #4:
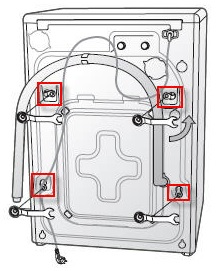
Remove the Shipping Bolts
Your washer is delivered from the factory with 4 shipping bolts installed. When you install your the washer, you must remove the shipping bolts.
- If you do not remove the shipping bolts, your washer will vibrate excessively which can cause permanent damage to the washer tub.
- Do not discard the shipping bolts because they may be needed in the future.
- If you transport the washer, you must re-install the shipping bolts.
- You must install the shipping bolts if you are going to lay the washer on its side for pedestal installation.
- Shipping bolts are available from Samsung Parts. Visit www.samsungparts.com and enter "shipping bolt" into the key word search to find the part number and cost.
Removing the shipping bolts:
- Loosen all bolts with the supplied spanner.
- Slide the bolt and spacer up. Remove the spacer bolt through the hole in the washer's rear wall. Repeat for each bolt.
- Keep the shipping bolts and spacers for future use.
STEP #5:
Level the Washer
Leveling the washer is critical. An unbalanced washer can cause many different problems, including vibrations, odors, and detergent drawer residue.
- The easiest way to begin the leveling process is to loosen the jam nuts and have the washer legs screwed all the way up in the washer chassis.
- Slide your washer into position.
- Try rocking the washer back and forth, and side to side. If the washer rocks, adjust the uneven leg(s) so all legs are level with another and the washer no longer rocks.
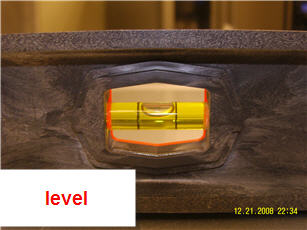
- Place a torpedo level on the top of the washer. You can measure the washer's level from the front to back, or right to left. It doesn't matter which you do first.
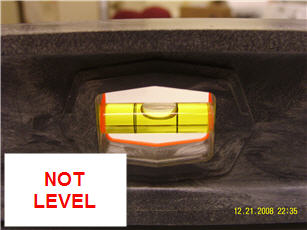
- Note the position of the air bubble on the level to determine a properly leveled surface.
- Level your washer by turning the leveling legs in or out as necessary. When your washer is level, tighten the jamb nuts.
General notes:
- A properly leveled surface looks like this:
- An improperly leveled surface looks like this:
- Your washer must be leveled on all four sides. It may take quite a few tries to get all the sides level. After the first dozen washes, it's a good idea to recheck if the washer is still level and if the jamb nuts are still tight.
- Once the washer is leveled on all sides, place a few articles of clothing into the washer and run a spin only cycle to check for excessive vibrations.
- Make sure the shipping bolts are removed.
- If you install your washer on a carpet or other soft flooring surface, you should place the rubber cups under the adjustable leg. Before placing the rubber cups, remove the film covering the double-sided tape.
- If the washer is on the pedestal, the rubber cup should be placed underneath the pedestal's legs.
STEP #6:
Power On
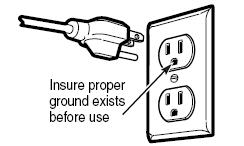
Plug the power cord into a 3-Prong, well-grounded 120 volt 60 Hz electrical outlet that is protected by a 15-amp fuse or a comparable circuit breaker. Your washer is grounded through the third prong of the power cord when it's plugged into a three-prong grounded receptacle.
����������������������������������������������������������������������������������������������������������������������������������������������������������������������������������������������������������������������������������������������������������������������������������������������������������������������������������������������������������
|
