|
No title
Question:
How
do I set the clock and On/Off Timer on my TV?
Answer:
To turn on the On/Off Timer on your TV, you must first set the clock.
If you do not set the clock, the On/Off Timer will either be inaccessible and
grayed-out, or accessible, but you will not be able to set it or turn it on.
Setting Your TV's Clock
To
set the clock on your TV follow the steps below:
- Press
the MENU button to display your TV�s menu.

- Press
the up or down arrow buttons to select "Setup" then press the ENTER button.
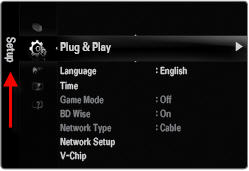
- Press
the up or down arrow buttons to select "Time", then press the ENTER button.

- Clock
will be highlighted press the ENTER button to enter the clock sub-menu.
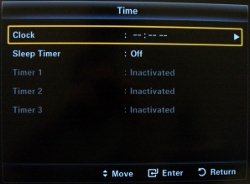
- Press
the ENTER button to select clock mode.
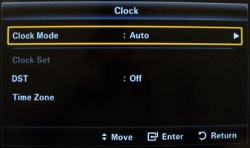
- Press
the up or down arrow buttons to select "Manual", then press the ENTER button.
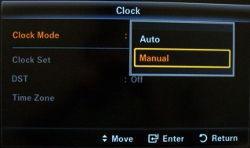
- Press
the up or down arrow buttons to select "Clock Set", then press the ENTER button.
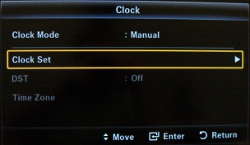
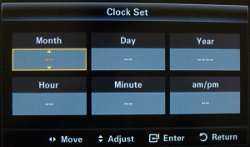
- Use
the Left and Right arrow buttons to select "Month", "Day", "Hour", "Minute",
or "am/pm" and the up or down arrow buttons to set the time and date. When you have
all the different sections set how you want them press the ENTER
button to save.
Note:
You can also set the month, day, year, hour, and minute directly by pressing
the number buttons on your remote control.
- Press
the EXIT button to exit.
Note:
The current time will appear every time you press the INFO button.
Setting Your TV's On/Off Timer
The On/Off Timer lets you set the TV so that it
automatically turns on and off at the same time each day.
To set the On/Off Timer, follow these steps:
- Turn on your TV.
- Press the MENU button on your remote control. The
Main menu will appear.
- Use
the up or down arrow button on your remote
to select Setup, and then press the ENTER button. The Setup menu appears.

Note:
The sub-menu's name will be displayed on the left side of the screen.
- Use
the up or down arrow button on your remote
to select Time, and then press the ENTER button. The Time menu appears.
- Use
the up or down arrow button on your remote
to select Timer 1, 2, or 3, and then press the ENTER button. The Timer setting
screen
appears.
- Use the up or down arrow button on your remote
to set the Hour, and then press the right arrow button on your remote to move to
Min.
- Set Min
and am/pm using the
same method as in Step 6.
- Set Activation to Active using the same method as in
Step 6.
- You
may also a Power off timer using the same method as in Step 6.
- Set
the Volume level, Source, Antenna and Channel using the same method as in
Step 6.
Note:
You may only select the Coax (RF) input or USB as the source. You may not
set HDMI, Component, or Composite as the source.
- You
may also set the frequency of the timer. (Once, Everyday, Mon ~ Fri, etc.)
using the same method as in Step 6.
- Press the
ENTER button to save your settings. After doing this you will
return to the Time Menu.
-
Press the EXIT button to exit.
��������������������������������������������������������������������������������������������������������������������������������������������������������������������������������������������������������������������������������������������������������������������������������������
|
